Last fall, my girlfriend Kiley and I learned that both our house and garage roofs needed new lids. Having little roofing experience between us, we first considered going the traditional route of hiring a roofing company to do the work. However, after getting five or six bids ranging from $14,000 to $18,000, we quickly realized that hiring professionals was outside our budget, and thus not an option. We decided to step outside of our comfort zones and tackle the job ourselves with the help of family, friends, and sponsors (PABCO Roofing Products & Washington Cedar Supply Co.). Because I like to record everything, I decided to complicate the job further by filming it from start to finish. My video is now available on YouTube for those interested.
In this blog post, I’d like to expand on some of the key points of roofing in order to help novice roofers and first-time homeowners (like Kiley and I) better understand how roofs get laid. While my article will not likely be sufficient to guide you through an entire re-roof from start to finish, it should help you understand the order of operations of residential roofing. Hopefully, after reading this post and watching the included videos, you’ll be better equipped to have productive discussions with roofing contractors and product manufacturers should you ever need to replace your own roof. Furthermore, I hope my tips and tricks save you money, lots and lots of money!
How to Tell if a Roof Needs Replacing?
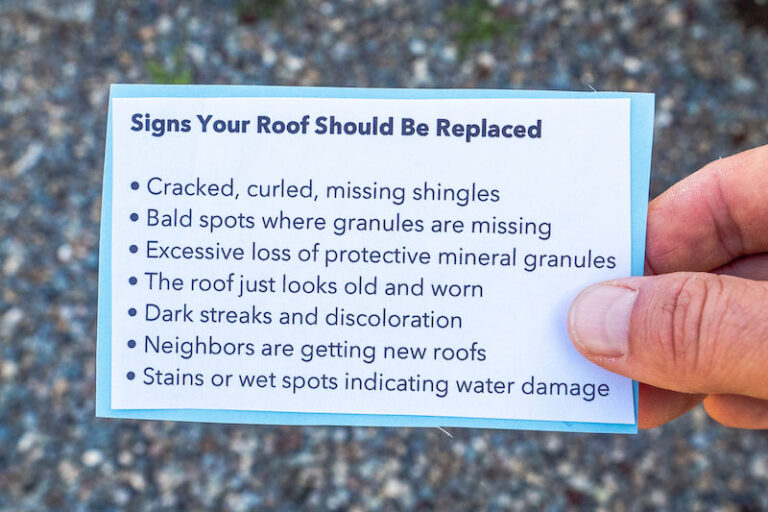
First things first, before you start ripping shingles off your house, it’s a good idea to carefully inspect your roof to make sure it actually needs replacing. Otherwise you’ll be throwing cash into the wind for nothing. Use the checklist below to conduct your own roof evaluation.
Roof Inspection Checklist
- Roof looks old and worn
- Cracked, curled or missing shingles
- Bald spots on shingles and/or excessive loss of protective mineral granules
- Excessive sand (shingle granules) accumulation in the gutters
- Dark streaks and discoloration
- Neighbors are getting new roofs
- Stains/wet spots indicating water damage
- If your roof is leaking, that’s a sure sign you need a roof replacement!
Write these bullet points out on an index card or save them to your phone and take the checklist with you up on the roof. This will help you remember everything on the list, minimize trips on and off the roof, and allow you to survey your shingles more accurately.
Note: If you’re afraid of heights, it’s okay to examine your roof from the ground. If you decide to assess your situation from ground level, it’s helpful to have a pair of binoculars on hand or a camera with a zoom lens to get a closer look at what’s going on above.
Congratulations! If you’ve made it this far, you’ve already saved yourself between $100 and $300! Some roofing companies charge a fee for evaluating roofs and writing estimates. By doing it yourself, you won’t need to pay these fees.
Finding Roof Pitch
Once you’ve surveyed your roof and determined that roof replacement is necessary, you’ll need to figure out your roof pitch. This is also easy to do with a few basic tools and simple geometry. Remember your elementary school math class? Finding roof pitch is the same as calculating rise over run. For this process you’ll need a tape measure and a level that’s at least one foot (12 inches) in length. Grab these tools and climb back up on your roof and find a safe spot to sit down.
Set one end of the level on the shingles pointing up toward the roof crest. The other end of the level should now be pointing down toward the gutter line by default. Next, adjust the level until the bubble indicates that it’s perfectly level. With your tape measure, measure the space between the bottom of your level and the top of the shingles at the one-foot mark. You should get a reading of four, five, six, seven, eight, or nine inches. This number represents the rise. The 12-inch level represents the run. Your roof pitch is read as a fraction (rise over run). For example, if you measured eight inches from level to roof at the 12-inch mark, your roof pitch is 8/12. Our house roof has an 8/12 pitch and our garage measures in at 6/12.
If the last two paragraphs made no sense what so ever, this video might be easier to understand.
Calculating How Much Roofing Materials to Buy
Roof surfaces are measured in units called “squares.” A square is equal to 100 square feet of roof. To estimate how many shingles you’ll need to cover your home, you need to first figure out the total square footage of your roof’s surface. This will require an additional trip onto the roof with a tape measure.
Carefully climb up on your house and measure the length and width of each plane of roof (including all additions, dormers, etc.). Then, multiply length times width and divide by 100 to determine how many squares are in each roof plane. Finally, add up all the squares to get a total. This will give you an idea of how many squares you’ll need to roof your entire structure. It’s a good idea to purchase a few extra squares of materials to account for human error.
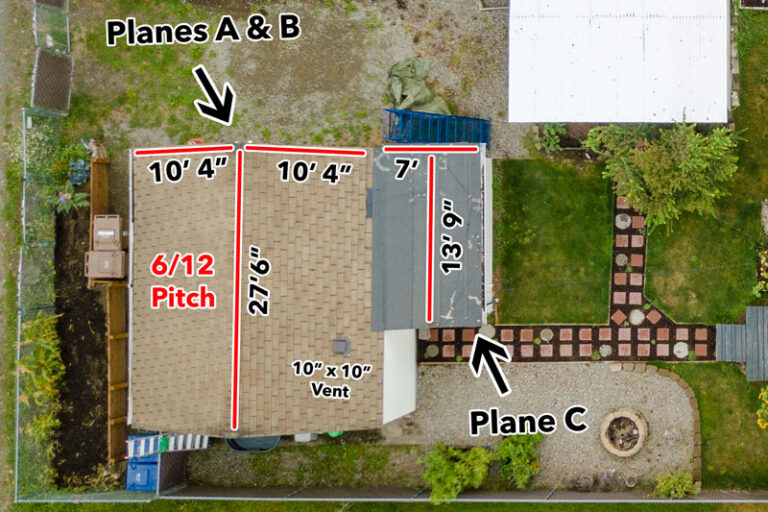
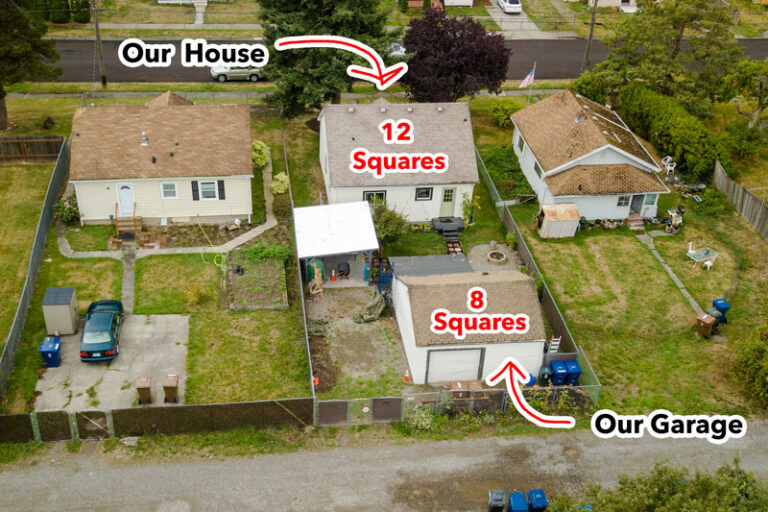
Let’s use our garage as an example. Our garage has three sections of roof. Two planes on the actual garage (Planes A & B) and one plane on the newish addition (Plane C). To find the number of squares needed to cover the entire structure, we measured all three of these sections as follows:
Plane A: Length x Width ÷ 100 = Surface in Squares
Plane B: Length x Width ÷ 100 = Surface in Squares
Plane C: Length x Width ÷ 100 = Surface in Squares
After adding all the squares together, we determined that we needed eight squares to re-roof our garage roof. We repeated the calculations mentioned above on the house and figured out that it required 12 additional squares of materials. So, to cover garage and house, we needed a total of 20 squares. We got 22 squares of shingles and underlayment to account for any measurement errors that may have occurred.
3-Tab Shingles vs. Architectural Shingles
Once you’ve determined roof pitch and counted your squares, it’s time to start thinking about what type of shingles you want to use on your home. One of the things that I found most confusing, with regards to roofing, was figuring out which shingles were 3-tab and which were architectural. When speaking with roofing professionals, the terms “3-tab,” “architectural,” “laminate,” and “dimensional” were constantly thrown around and yet I had no idea what these words meant. To save you all the confusion and headache, let’s break it down here and now.
While there are many different types of roofing materials to choose from, the overwhelming majority of homes in the United States are covered with asphalt shingles. Asphalt shingles are divided into two main types: 3-tab and architectural. 3-tab shingles are typically older-style shingles, which have three tabs and lay flat on a roof.
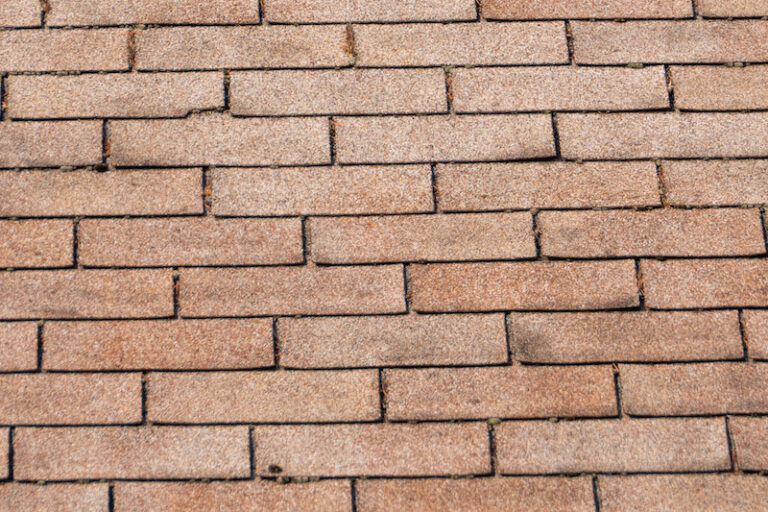
Architectural shingles have a busier, compounded pattern with a three-dimensional look. For this reason they are sometimes referred to as “dimensional shingles.” It’s also helpful to note that the words “architectural,” “laminate,” and “dimensional” can all be used interchangeably as they all describe the same type of shingle.
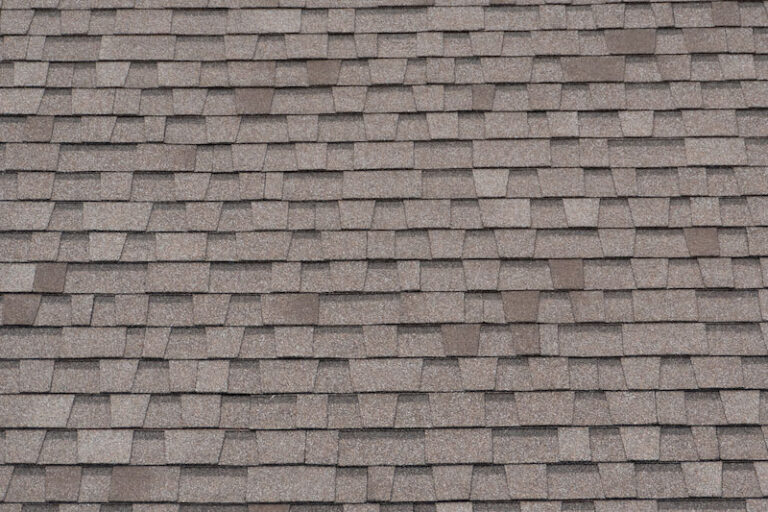
Architectural shingles are quickly becoming the new industry standard. While they cost a bit more to install, they have way more benefits to the homeowner! To learn more about differentiating shingles, watch the video below.
Advantages of Laminate Shingles:
- Give roof more of a three-dimensional look (which many homeowners prefer)
- Raise property values
- Dimensional shingles are thicker and weigh more than 3-tab shingles. This means that gravity presses them down against the house and keeps your house better protected against the elements.
- Architectural shingle thickness helps insulate your home a little bit
- Architectural shingles also last longer than traditional 3-tab shingles
Long story short, while you might fork over more money upfront for dimensional shingles, you’ll save heaps of cash in the long run because your roof will look better and last longer.
Choosing Quality Architectural Shingles
The next step in roof replacement is shingle selection. When I was doing my initial Googling, I wanted to understand what makes a good shingle. As is often the case online, the more I read, the more confused I became about smart shingle selection. For every opinion pointing in one direction, there is an equally valid opposing view. Furthermore, when you pair these differing opinions with the sheer volume of roofing products available to consumers online, being overwhelmed is pretty much guaranteed. Eventually, I was able to identify five key characteristics that make up quality dimensional shingles.
Essential Shingle Traits to Look for:
- Wind Resistance–Can shingles withstand high (100+ mph) winds?
- Solar Reflectance–Do shingles absorb or reflect heat? Ideally, they should reflect heat.
- Impact Resistance–Can shingles withstand extreme weather (namely rain, snow, and hail)?
- Algae Resistance–While algae and/or moss doesn’t pose immediate dangers to a roof, they are unsightly and could decrease your property’s curb appeal.
- Fire Resistance–Is the shingle flammable or not? Most modern shingles are fire-resistant.
Most modern laminate shingles satisfy these norms and are thus, the most common choice that homeowners reach for. That said, not all shingles are made the same. Like literally everything else in this world, some brands produce better products that last longer than others. In my research, PABCO roofing materials were consistently cited as top-notch. When I visited their website, I discovered that PABCO is a family-owned business based in Tacoma, Washington. Guess who else lives in Tacoma? I do!
Kiley and I chose to roof with PABCO shingles because they are local, make their products domestically, and have a great reputation. When they eventually agreed to sponsor my video project, this only sweetened the deal. As an added bonus, the Pacific Northwest is a really rainy place and I thought that a company, which runs its operations here, must know how to make good rainproof products. I was correct in my assumptions. Winter 2020 has been one of the wettest winters in Washington’s history. I’m thrilled to report that our new roofs have kept both garage and house bone dry!
The shingles PABCO sent over are called “PABCO Prestige.” They are a premium heavyweight, laminate shingle rated for 50 years of life (some terms and conditions apply). Prestige shingles come in 16 different colors thus giving you lots of options to choose from. After running some light tests (see video below) we chose a pleasant grayish/brownish color called “Weathered Wood” for both house and garage.
Finally, Prestige shingles feature something called “Algae Defender.” Algae Defender is a proprietary mixture of copper particles, which fight algae, mold, and moss and prevent black streaks from occurring on a roof. Theoretically, our new shingles will prevent such marks from appearing on our house. Maybe if YouTube still exists in half a century (when our shingles reach the end of their life), I’ll do a follow up video to see how the Algae Defender held up?
How to Properly Use a Sample Shingle Board
You should never select a shingle color under florescent lights in a warehouse or showroom. If you do, you risk being unpleasantly surprised when you see your freshly nailed shingles lying on the roof. The problem with choosing shingle colors indoors is two fold. First, man-made lighting isn’t a great representation of the sun. Secondly, outdoor lighting is constantly changing, thus perpetually affecting shingle color.
The better, smarter way to go about choosing roof color is to do it outside. Lucky for you, there’s a simple tool, which aids this process greatly. The tool is called a “Sample Shingle Board” and most reputable roofing supply companies provide them to customers free of charge. A sample shingle board is basically a piece of hard cardboard that’s fitted with multiple small shingle samples in a range of different colors.
Such boards are designed to be referenced against your house outdoors. Outdoor viewing allows you to accurately match shingle color to the exterior color scheme of your house. Additionally, it’s wise to refer to your sample shingle board at different times of the day (namely morning, mid-day, and evening). This will ensure that you’re satisfied with your chosen color in all types of light conditions.
Get Shingles Delivered and Avoid Unnecessary Back Pain
Here are two truths that all roofers are highly aware of:
- Shingle bundles are heavy (typically 50-90lbs per pack)
- Aluminum ladders are rickety (especially when awkwardly carrying hefty shingle stacks up them)
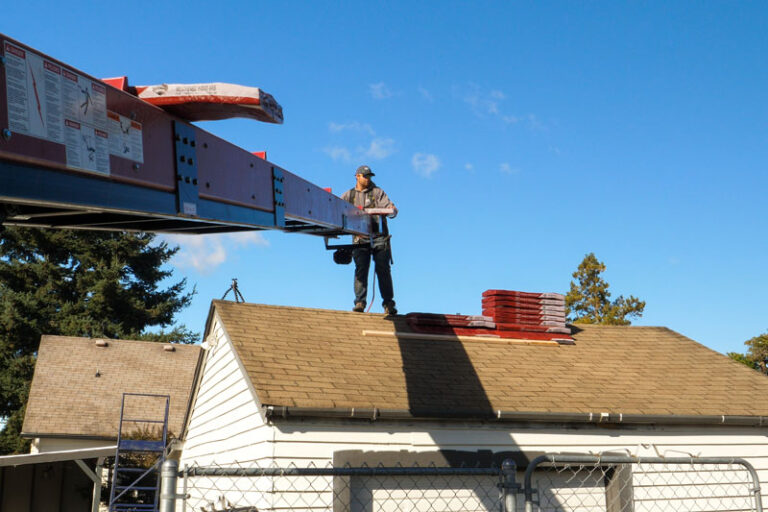
Thus, if you can get your shingles delivered, roofing becomes better, safer, and much more fun. Moreover, if you can get your materials dropped straight on the roof, you can skip the most unpleasant part of roofing. A local, Tacoma-based company called “Washington Cedar & Supply Co.” delivered our shingles to us. Washington Cedar & Supply Co. owns a fleet of trucks with huge, conveyor-belt arms, which can load shingle bundles anywhere they please (provided that the truck can get within reach of the final destination). Delivery and drops costs vary by company and region. For reference, Washington Cedar & Supply Co. bills between $75-$200 per delivery. These rates account for different factors and job complexity. I think it’s well worth it to pay for material delivery.
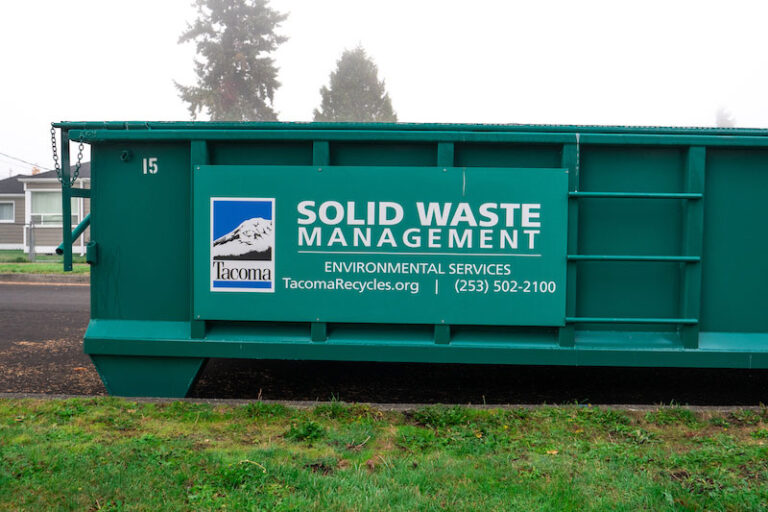
Hiring a Job Site Dumpster
Hiring a giant job site dumpster is another great way to save money on waste disposal and labor. Before a new roof gets nailed down, the old roof needs to come off and be properly disposed. If you’re doing the job yourself, you can choose to either rent a trailer and haul old waste to the dump or hire a waste bin to be dropped in a desired area. Most cities offer dumpster delivery services via municipal waste management outfits and/or private equipment rental companies. Such services cost around $500 to $600 in my area. I did the math on renting a trailer and hauling old shingles to the dump versus renting a street garbage bin (which gets picked up and dumped by the city once full) and discovered that its hundreds of dollars cheaper to opt for the job site dumpster. This is option I recommend for DIY-ers.
Note for Environmentally Conscious Readers: It’s also worth mentioning that some US cities offer special bins for recycling old roofing materials. Keep in mind, such services might require you to separate different materials before throwing them into a bin.
Shingle Removal
Another area where thrifty homeowners can save some serious coin is in the tear off. Ripping old shingles off of a roof isn’t rocket science and most able-bodied people can manage the job without any professional oversight. With a few basic tools like a shovel and a hammer, you and a few friends can spend a day or two plucking shingles, nails, old vent covers, and underlayment and prepare your house for a professional re-roof. This can literally save you thousands of dollars.
If you decide to remove an old roof yourself, here are a few important things to consider: first, ripping off old shingles is hard work and will require you to swing a shovel on a roof. You’ll need to be surefooted and comfortable working in high places. Secondly, some contractors won’t do partial re-roofs as it eats into their profit margins and doesn’t guarantee a removal that’s up to their standards. Thus, if you’re getting your new roof laid by a professional outfit, it’s a good idea to call ahead and double-check that they’re okay with you sharing in the grunt work. I encourage you to carefully watch how we removed our shingles (minute 29 in the How to Roof a House video at the top of this blog post) to solidify proper shingle removal techniques.
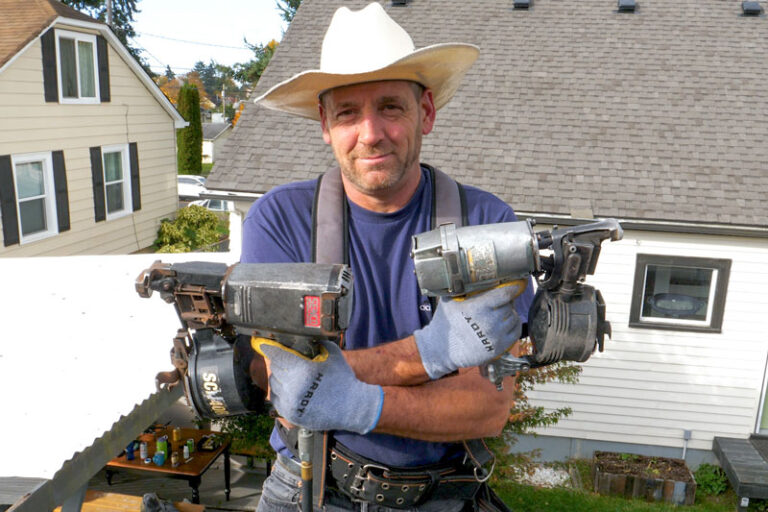
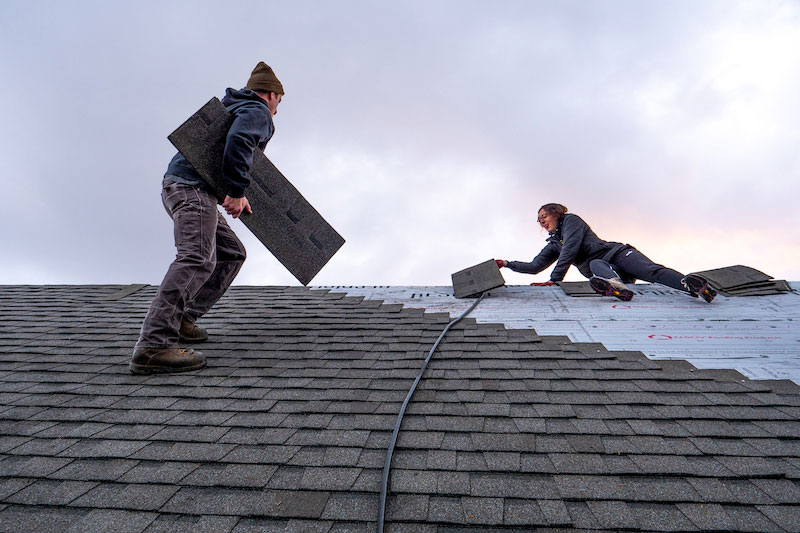
Hire Pros to Lay a New Roof
Once you make it through all the other steps, it’s time to lay down a new roof. Having only roofed one property thus far, I can unequivocally say that I would not feel comfortable re-roofing my home on my own. Laying shingles is an art that takes many hours of practice to perfect. There are also tons of nuances that are nearly impossible to grasp as a novice. Furthermore, improper underlayment/shingle installation can lead to leaks in the roof and cause property damage. In other words, the consequences of making an error are steep.
For these reasons, I recommend not skimping on this stage and hiring professionals. It’s worth every penny. Do your due-diligence and research reputable roofing outfits in your area. It’s also wise to talk to your friends and relatives and ask them for contractor recommendations. You never know, you might get lucky and have a few roofers in the family? Finally, if you live in Southern Oregon, you might consider hiring Darren and Matt (contact info listed below).
That’s roofing in a nutshell.
When all’s said and done, it’s time to brag to your friends about how easy it is to replace a roof!
Additional Resources
PABCO Roofing Products: https://www.pabcoroofing.com
Washington Cedar & Supply Co.: https://www.washingtoncedar.com
MDC Construction LLC (Darren and Matt’s company): website coming soon…